Data Import
Bulk-load records from a file into your API's Elasticsearch index — create a new model on the fly or populate an existing one.
What is Data Import?
Data Import lets you upload a structured file (CSV, Excel, or an archive) and have SearchAPI read each row, create the necessary Elasticsearch documents, and make the records immediately queryable via your API endpoints. The import runs as an asynchronous job — you can monitor progress in real time on the same page, then review any row-level errors in the job detail view.
Supported File Formats
The following formats are accepted. The maximum file size is 100 MB.
-
CSV — plain text, one row per record. You must specify the delimiter character (default:
,). -
XLSX — Excel workbook. The first sheet is used.
-
ZIP / TAR / TAR.GZ / TAR.XZ — compressed archives. The archive must contain a single CSV or XLSX file.
Import Modes
Before uploading a file, choose one of two Import Modes:
-
Create New Model + Mapping + Endpoint — SearchAPI reads the file headers, infers a field type for each column, and lets you review and adjust the mapping before the job starts. A new model and a new endpoint are created automatically in the selected API version, and all rows are indexed.
-
Import Into Existing Model — maps each field of an existing model to a column in your file. Records are upserted into the model's current Elasticsearch index. Useful for refreshing or extending data without changing the model definition.
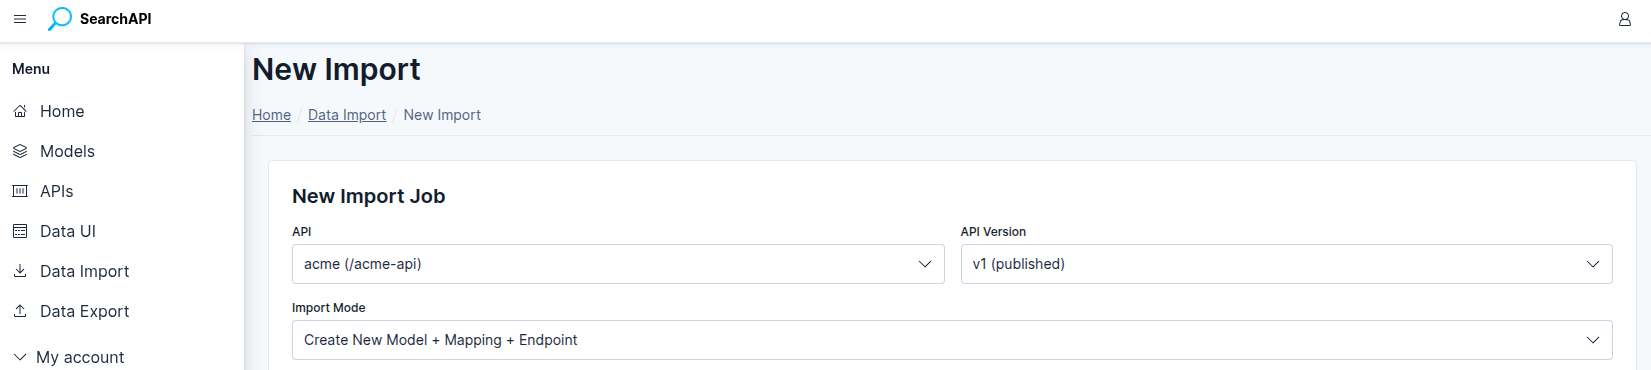
Selecting API and Version
Navigate to Data Import in the sidebar and click + New Import. Select the target API and API Version from the dropdowns. The version dropdown only shows published versions, as records can only be indexed into a deployed Elasticsearch index.
 New Import — select API, version and import mode
File Settings
After selecting the import mode, configure the following settings before or alongside choosing your file:
-
CSV Delimiter — a single character that separates columns (e.g.
,,;,\t). Required when the file is a CSV. Has no effect for XLSX or archives. -
File has header row — checked by default. When enabled, the first row of the file is treated as column names; when unchecked, the system generates positional names (
col_0,col_1, …). -
File — click the file picker and select your file. Uploading a file immediately triggers a header-read request so the field configuration table can be populated.
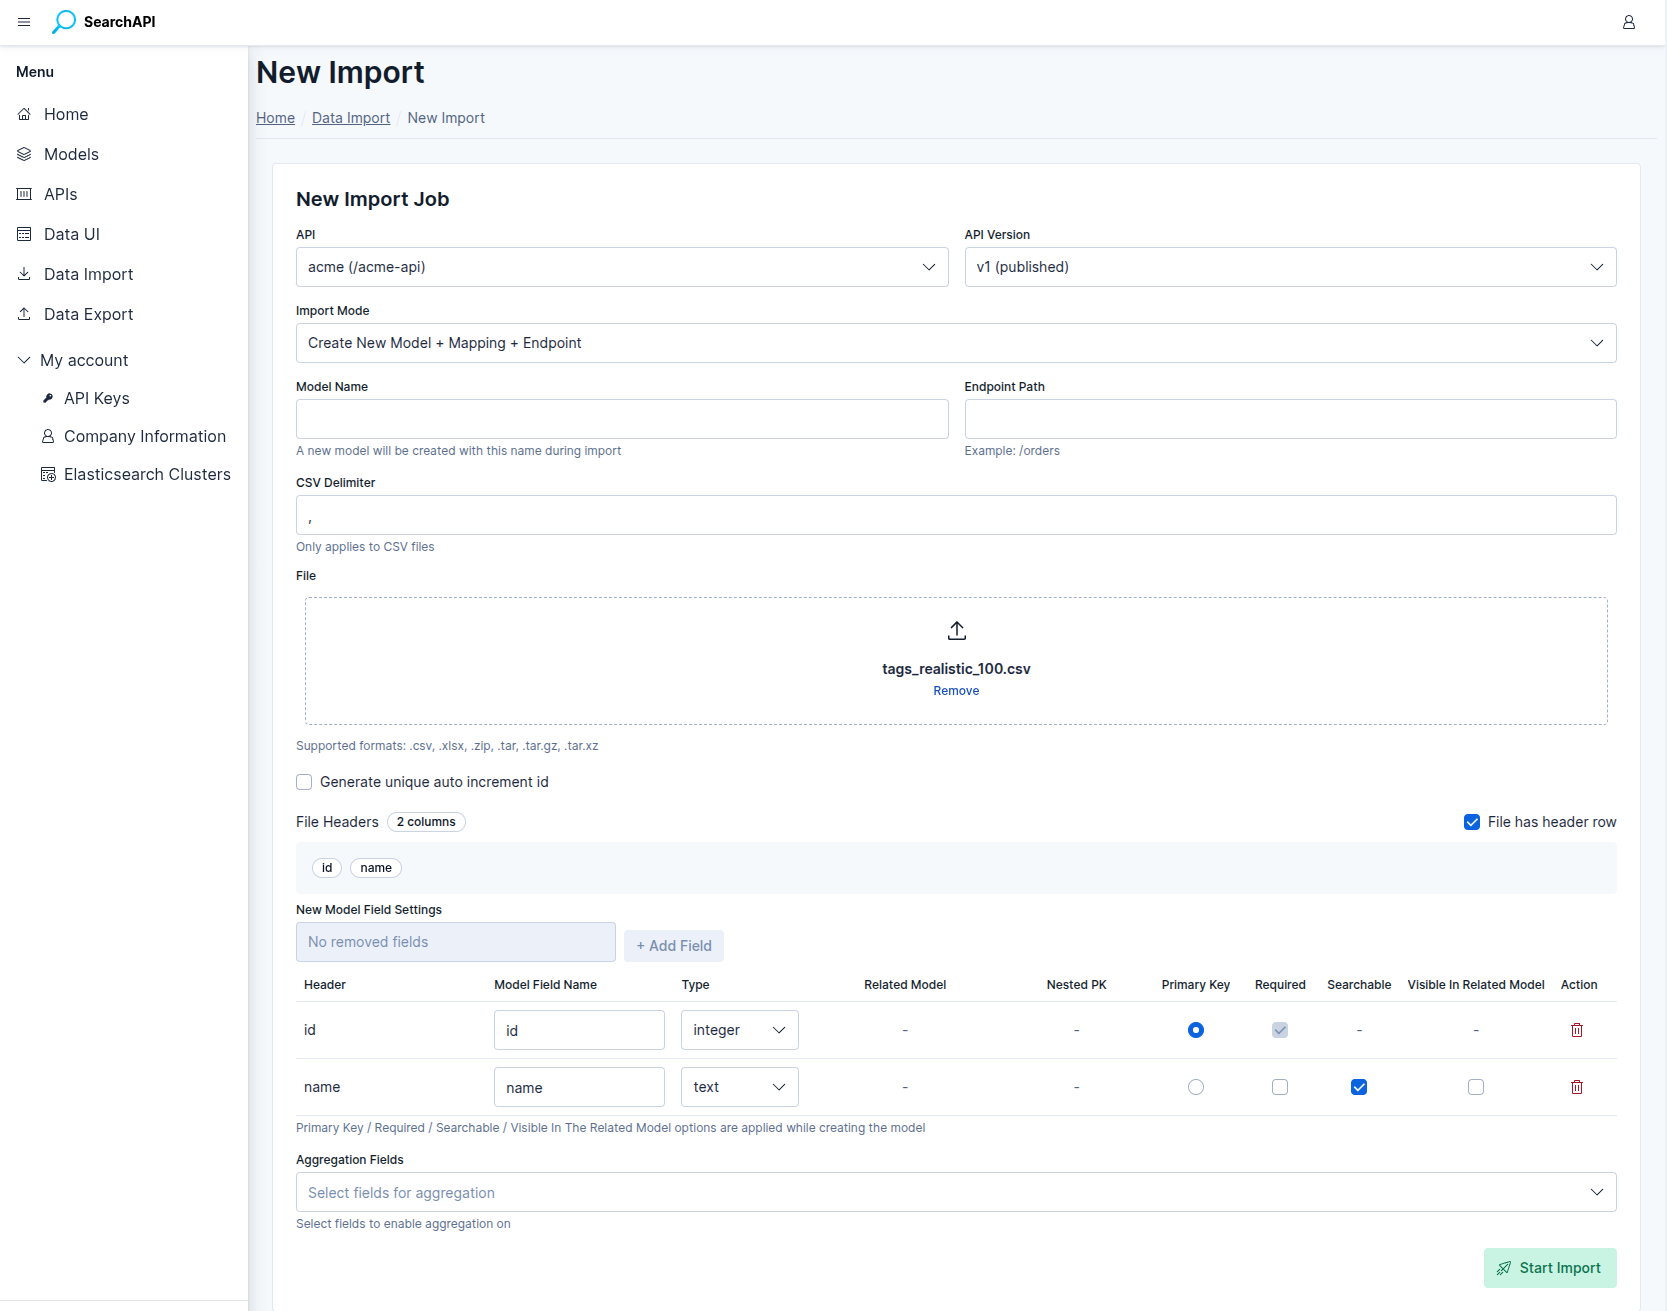
New Model: Field Configuration
In Create New Model mode, two additional inputs appear before the field table:
-
Model Name — the name of the new model (max 50 characters, letters, digits and underscores only).
-
Endpoint Path — the URL path segment for the new endpoint (e.g.
/orders, max 80 characters).
Once a file is loaded, the system reads up to 1 000 sample rows, infers a field type for each column, and renders a configuration row per column:
-
Field Name — editable. Defaults to the sanitised column header (lowercase, alphanumeric and underscores only). Must be unique across all fields.
-
Field Type — inferred from sample data. Can be changed to any of the supported types:
text,keyword,integer,long,float,date,boolean,json,object,nested. -
Primary Key — exactly one field must be marked as the primary key. Its type must be
integerorkeyword. The system pre-selects a column namedidif one exists and its type qualifies. -
Required — marks the field as required in the model definition. Primary key fields are always required.
 New Model — field configuration table after file upload
Generate Unique Auto-Increment ID
If your file has no natural primary key column, check
Generate unique auto increment id. The system will create an
auto-increment primary key under the name you specify in the
Primary Key Column field (default: id). The column
must not be present in the file headers. When this option is active, no field in
the configuration table needs to be marked as a primary key.
Object Fields (Relational)
A field configured as type object creates a relational link to another
model. Your file column must contain the primary key value of the
related record — the import process uses that value to look up the related record and
embed it as a full object in the indexed document.
For example, if a products file has a category_id column
mapped to an object field pointing to a categories model:
category_id: 5
The system looks up the record with primary key 5 in the
categories model and embeds it as an object containing the relation
model's primary key plus all fields marked as
visible in related models. Fields not marked as visible are not included.
The indexed document will look like:
{
  "id": 1,
  "name": "Running Shoes",
  "category": {
    "id": 5,
    "name": "Sports",
    "slug": "sports"
  }
}Nested Fields
A field configured as type nested stores an array of embedded
objects inside a single document. Like object fields, the system looks up
related records from a relation model and embeds them — the difference is that nested
fields hold multiple related records per row, stored as an Elasticsearch
nested array.
The source column must contain a JSON value (detected automatically during header loading). The system supports two column formats:
Format 1 — flat array of IDs
The column contains a JSON array of plain scalar values. Each value is the primary key of a related record. Leave the Nested Primary Key field empty when using this format.
tag_ids: [1, 5, 9]
The system looks up records with primary keys 1, 5, and
9 in the relation model and embeds each one as an object containing the
relation model's primary key plus all fields marked as
visible in related models. The indexed document will look like:
{
  "id": 42,
  "title": "Laptop Stand",
  "tags": [
    { "id": 1, "name": "electronics", "color": "blue" },
    { "id": 5, "name": "accessories", "color": "gray" },
    { "id": 9, "name": "sale",        "color": "red"  }
  ]
}
Format 2 — array of objects with an ID key
The column contains a JSON array of objects, where each object holds a foreign key
alongside other properties. Set the Nested Primary Key to the key
name that holds the foreign key (e.g. tag_id). The system extracts that
key from each object, looks up the related record, and embeds it — any extra keys in
the source object are ignored.
tags: [{"tag_id": 1, "qty": 3}, {"tag_id": 5, "qty": 1}]
The system reads tag_id from each object, looks up those records, and
produces the same embedded result — the qty key from the source is not
carried over:
{
  "id": 42,
  "title": "Laptop Stand",
  "tags": [
    { "id": 1, "name": "electronics", "color": "blue" },
    { "id": 5, "name": "accessories", "color": "gray" }
  ]
}Aggregation Fields
In Create New Model mode, the Aggregation Fields selector lets you choose which fields should be enabled for aggregation queries on the GET list endpoint that is created automatically with the import.
The selector is populated once your field configuration is complete and lists two categories of options:
-
Scalar fields (text, keyword, integer, etc.) — appear directly by their field name (e.g.
status,category). -
Sub-fields of object / nested relations — appear using dot notation:
parentField.subField(e.g.category.name). All fields of the related model that are marked as visible in related models are listed, as well as the relation model's primary key.
Aggregation fields are registered on the GET list endpoint immediately when the import job is created — before any rows are written. For more information on how aggregation works on endpoints, see Endpoints.
 New Model — selecting aggregation fields before starting the import
Existing Model: Column Mapping
In Import Into Existing Model mode, select a model from the Model dropdown. The system lists every field defined in that model and asks you to assign a file column to each one.
Constraints for column mapping:
-
Every field must be mapped to a column — no field can be left unmapped.
-
Each file column can only be mapped to one field.
-
Nested fields require the mapped column to be a JSON column, and you can optionally specify the nested primary key from the keys detected in that column.
-
If Generate unique auto increment id is checked, the primary key field is excluded from the mapping — the system will generate a new ID for each row.
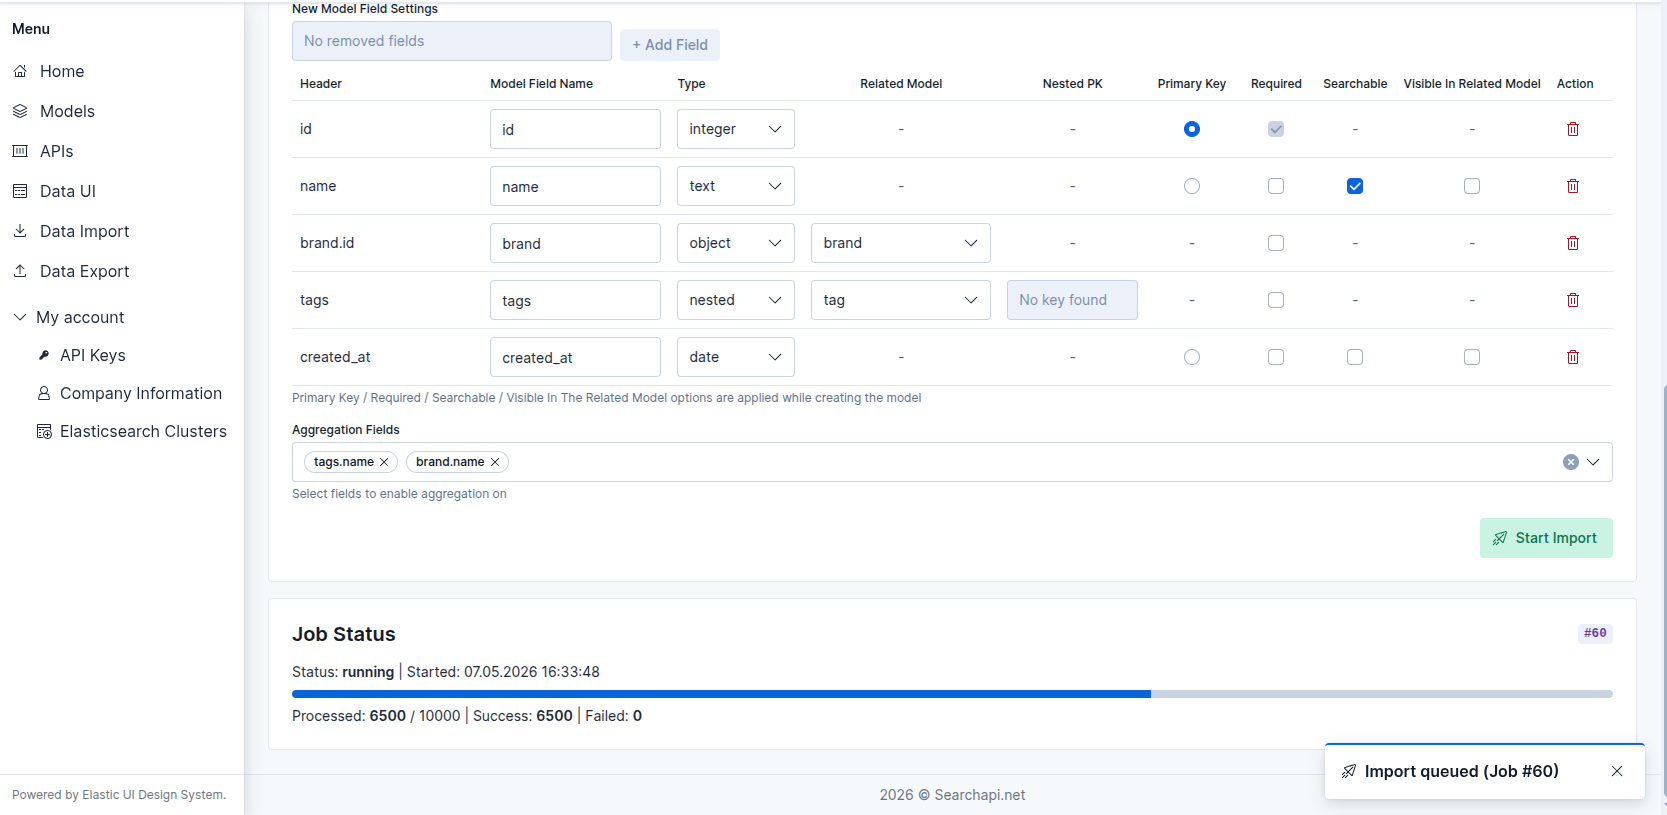
Starting the Import
Click Start Import. The system validates all inputs, creates an import job, and returns a job ID immediately. A toast notification confirms that the job has been queued (e.g. "Import queued (Job #42)"). The Job Status panel appears below the form and begins polling for progress every 2.5 seconds.
 Job status panel — import queued after clicking Start Import
Job Progress
The Job Status panel shows real-time progress while the import is running:
- Status — current job status (see below).
- Row counters — processed / total | success | failed.
- Start / Finish times — ISO timestamps shown once available.
Job Statuses
- queued — job is waiting in the processing queue.
- running — rows are actively being written to Elasticsearch.
- completed — all rows were written successfully.
- completed_with_errors — the job finished but one or more rows failed. Successful rows are indexed; failed rows are logged.
- failed — a fatal error stopped the job before it could finish. No rows were written after the point of failure.
Error Rows
When a job ends with status completed_with_errors or has a non-zero
failed row count, a Load Error Rows button appears in the Job
Status panel. Clicking it fetches up to 100 error rows and displays them in a
table with the following columns:
- Row — the 1-based row number in the original file.
- Primary Key — the primary key value of the failing row, if available.
- Error — a human-readable message explaining why the row failed.
Quality Gate — automatic job termination
To prevent runaway imports from filling the index with garbage data, the system
monitors error patterns during the run and stops the job early if either of two
thresholds is crossed. When a quality gate fires the job transitions to
failed — not completed_with_errors — and the reason is
recorded in the error summary.
-
100 consecutive row errors — if 100 rows in a row all fail without a single successful row in between, the job is stopped immediately. A successfully written row resets the counter to zero.
-
80 % error rate — checked every 1 000 processed rows. If at least 80 % of all rows processed so far have failed, the job is stopped. This check only activates after the first 1 000 rows have been processed.
Import Job List
Navigate to Data Import in the sidebar to see all previous import jobs. The list updates automatically every 3 seconds when any job is still queued or running. Each row shows the API, model, status or live progress bar, row counters, and start/end timestamps. Click the inspect icon to open the Job Detail page.
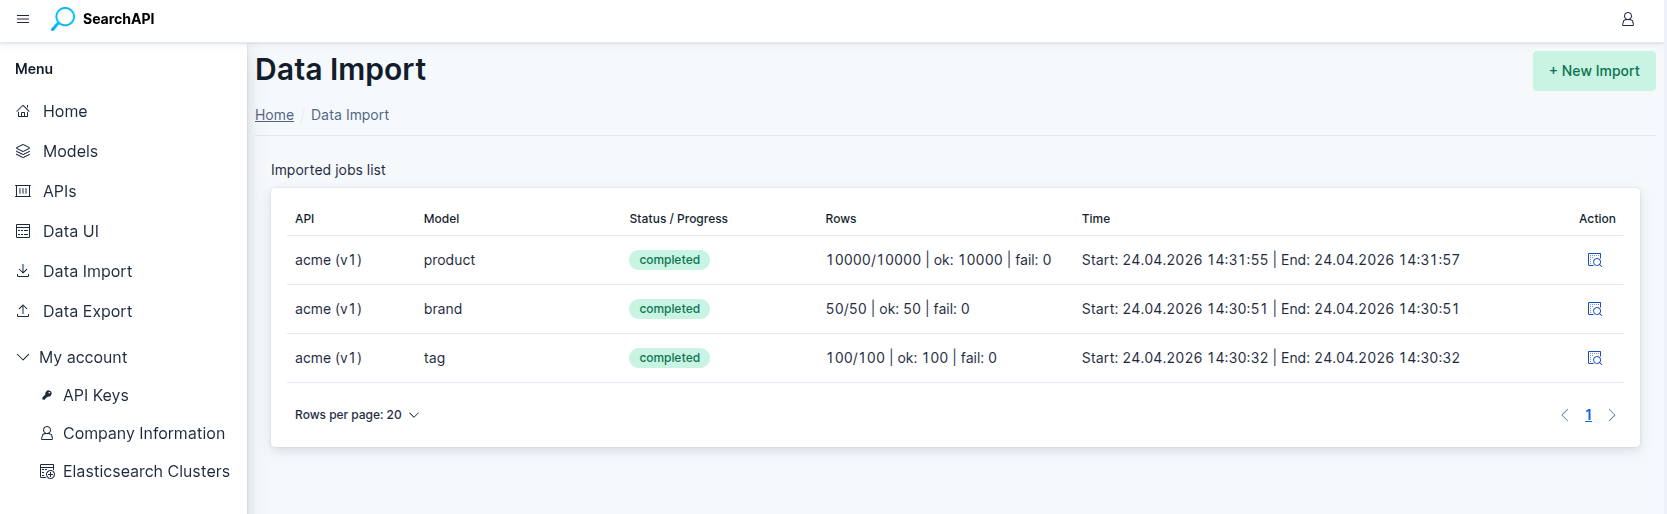 Import Job List — live progress bar on running jobs
Import Job Detail
The Job Detail page provides the complete record of a single import job, including:
 Import Job Detail — stat cards, metadata and error rows table
- Stat cards — total rows, successful rows, failed rows, progress percentage.
- Full metadata — job ID, API, import mode, model, endpoint path, primary key column, generate-unique-ID flag, has-header flag, delimiter, file name and type.
- Error summary — a badge indicating whether a fatal error occurred and its message.
- Error rows table — row number, primary key, error message, raw row data, and timestamp for every failed row.